Common Office Copier Problems (And How to Fix Them)
A malfunctioning office copier can cause a lot of frustration. Here’s how to fix common problems with copiers.
 When you’re managing a business you need day-to-day operations to run as smoothly as possible. The last thing you need to worry about is an office copier that keeps acting up.
But as you probably already know, copier malfunctions are inevitable. Certain makes and models are prone to different glitches, but some problems are common across all printers.
By educating yourself on common copier issues and how the fix them, you’ll cut back on down-time and unneeded repairs. Plus, fixing these problems if they happen in the future will be a piece of cake. Here are some tips:
1. Why are Copies Coming out With Streaks?
 This is a common problem that could simply be related to a foreign substance on the glass. If you’re making a copy with text or images and you notice streaks or lines on the paper, you need to open the top lid and check for any marks or objects.
If the streaks are still appearing after cleaning the glass with a soft cloth and window cleaner, make a copy of just the glass. If they still show up, the problem is most likely a damaged drum or toner cartridge.
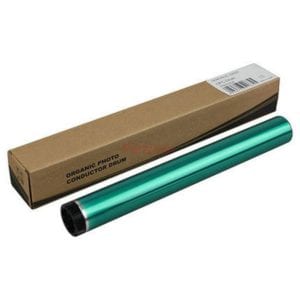
First, check the toner cartridges for any foreign substances or cracks. A damaged cartridge or drum will need to be replaced. We address replacing an office copier drum in the next section.
2. When Does the Copier Drum Need to Be Replaced?
Knowing when to replace the drum on your copier is pretty straightforward. Some units will notify you when the lifespan of a drum is nearing the end. But there are symptoms to look for if your printer doesn’t have this capability.
 If you notice that the image quality has deteriorated or lines and streaks are appearing on the copies, it’s probably time for a new drum. To replace a drum, follow these steps:
- With the machine on, open the top scanner cover
- You will see the drum and cartridge along with a locking mechanism
- Unlock the lever and pull out the old drum
- You should be able to pop the new drum in
- If done correctly the lock should lift into place
- Close the scanner door and throw away the old drum
Most drums should be good for about three toner replacements. It’s probably a good idea to keep some replacements on hand to avoid losing service.
3. Cleaning the Copier Drum
The drum and toner work together to produce copies. If you notice that pages are coming out dirty or missing text, you probably need to clean the drum.
To do this you’ll need latex gloves and a covered surface to work on. You’ll also need to power down the machine and let it cool off. Make sure you don’t expose the drum to too much light.
Remove the drum as indicated in the previous section. Open the small, hinged door on the drum to gain access to the section that needs cleaning. You will now be able to rotate the drum using the spindle located on the side of the drum.
As the drum is rotating, wipe off any debris using a soft cloth. Once all debris has been removed from the drum, close the hinged door and replace the drum. Test the copier to make sure there is no more debris showing on the copies.
4. What is Making the Copier Jam?
 Paper jams are probably the most common printer issue. Fortunately correcting a paper jam is a relatively easy and quick process.
Jams are usually caused by the wrong size paper being used or paper being loaded incorrectly. When the wrong size paper is fed into the copier from the housing tray, it will jam. This causes the printer to temporarily stop working.
First, you’ll want to confirm that there is, in fact, a paper jam. Check the housing tray to see if a piece of paper has become stuck. If so, slowly pull it out and remove any paper that has been torn away.
If the jam is not in the housing tray, you’ll need to lift the door located at the back of the printer. You’ll be able to see if a piece of paper has become stuck. Remove the jammed paper and close the door.
Make sure all paper being used is the right size for the housing tray and run a test copy.
5. Why Are Copies Coming out Entirely Black?
There are a number of reasons why you could be getting black pages from your office copier. Unfortunately, this is a more serious issue that may require a technician.
But there are a number of causes that you could possibly fix yourself. Here are a few common reasons for black pages.
- The drum wiper is malfunctioning
- The toner cartridge being used is defective
- The waste toner cartridge is full
If you see spilled toner when you open the machine, it will need to be cleaned and a new toner cartridge installed. If this is not the case, you may try replacing the drum as discussed above. If you’re still getting black pages you need to call a service repairman to come have a look.
6. Can My Office Copier Get a Virus?
 This is a good question and completely depends on the type of office copier you have and how it is set up. Office copiers are often connected to a network. If this is the case, it’s possible for the copier to be infected with a virus.
If a printer contains internal storage or is plugged into external storage, a virus is possible. A virus will attack from an infected system. If your copier is hooked up to the network and a virus has a way in, then it’s possible.
To prevent this, it’s essential that the network at your office be protected from malware. If you don’t have antivirus protection you are exposed to viruses.
Know the Condition of Your Copier
The best tool for avoiding copier issues is to stay up-to-date on the condition of your copier.
Make sure cartridges and drums are replaced and have a service technician come out periodically just to test your machine’s performance.
Commercial Copy Machine provides nationwide pricing and information on copiers and printers.
If you’re thinking of buying or upgrading a copier, we can help.

Leave a Reply
You must be logged in to post a comment.